Calendar Widget
Calendar View is a Type Widget display option that plots your records on a Day/Week/Month calendar instead of a grid. Any record with a start date and an end date becomes an event on the calendar, so teams can see scheduling, workload, and overlaps at a glance — and create new records by clicking directly on a free slot.
Overview
A Calendar widget is an ordinary Type Widget with Show As set to a calendar option. You choose which date attributes drive the event, and the widget takes care of placing every record in the right position on the calendar.
| I want to... | Widget Category | Show As | What the user gets |
|---|---|---|---|
| Show all records of a type on a shared dashboard | Dashboard | Calendar View | Records shown as calendar events; creating from an empty slot creates a new standalone record. Goes on a Home / Dashboard template. |
| Show only the records related to the record a user is viewing | Relation | Calendar View | Related records shown as calendar events; creating from an empty slot creates the record and links it. Goes on a View template. |
| Do the above, and also let users set working hours & holidays for that record | Relation | Calendar Configurator | The same calendar, plus Working Hours and Holidays setup saved on the record being viewed. Goes on a View template. |
Typical uses:
- A Maintenance Task dashboard showing scheduled work across the week.
- A Resource view page showing every booking linked to that resource.
- A Project view page where the team sets the project's working hours and non-working days, then schedules activities against them.
How it Works
Calendar-Specific Settings
When you pick a calendar option, three additional settings appear in the widget's details:
| Setting | Description | Required |
|---|---|---|
| Scheduling Precision | Date & Time (default) places events at a specific time of day. Date treats events as whole-day items. | No |
| Start Date & Time / Start Date | The attribute that supplies each event's start. The label changes with the precision you chose. | Yes |
| End Date & Time / End Date | The attribute that supplies each event's end. | Yes |
- The attribute dropdowns are filtered by precision: Date & Time lists Date & Time attributes, Date lists Date attributes.
- Changing the precision or the widget's Query Definition clears both attribute selections — reselect them afterwards.
- A Dashboard calendar lists attributes of its own type; a Relation calendar lists attributes of the related type.
What the Calendar Displays
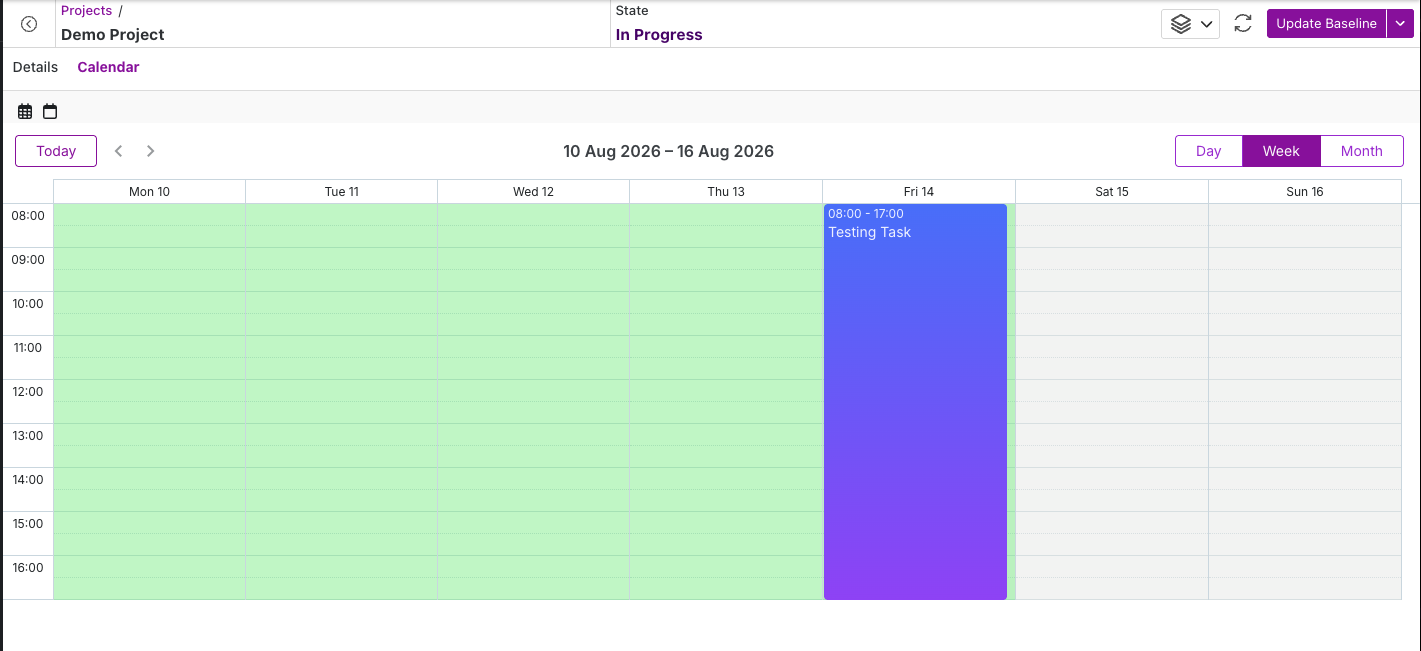
- Day, Week, and Month views, with a Today button and previous/next navigation. The calendar always opens on today's date.
- Each event shows the record's Name, positioned by its start and end values. Click an event to open that record's View page.
- Working hours are shaded green; non-working time and holidays are shaded gray. Users cannot create events in non-working slots.
- Click or drag an empty slot to open the create popup, pre-filled with that slot's dates. Existing events can't be dragged or resized — reschedule by opening the record and editing its dates.
- The toolbar keeps record count, Reload, and Filters (plus Export to CSV when enabled), but drops Search, Pagination, and Bulk Actions — none apply to a calendar layout.
Steps to Use
You need a type with two date attributes (e.g. Scheduled Start and Scheduled End) before you begin.
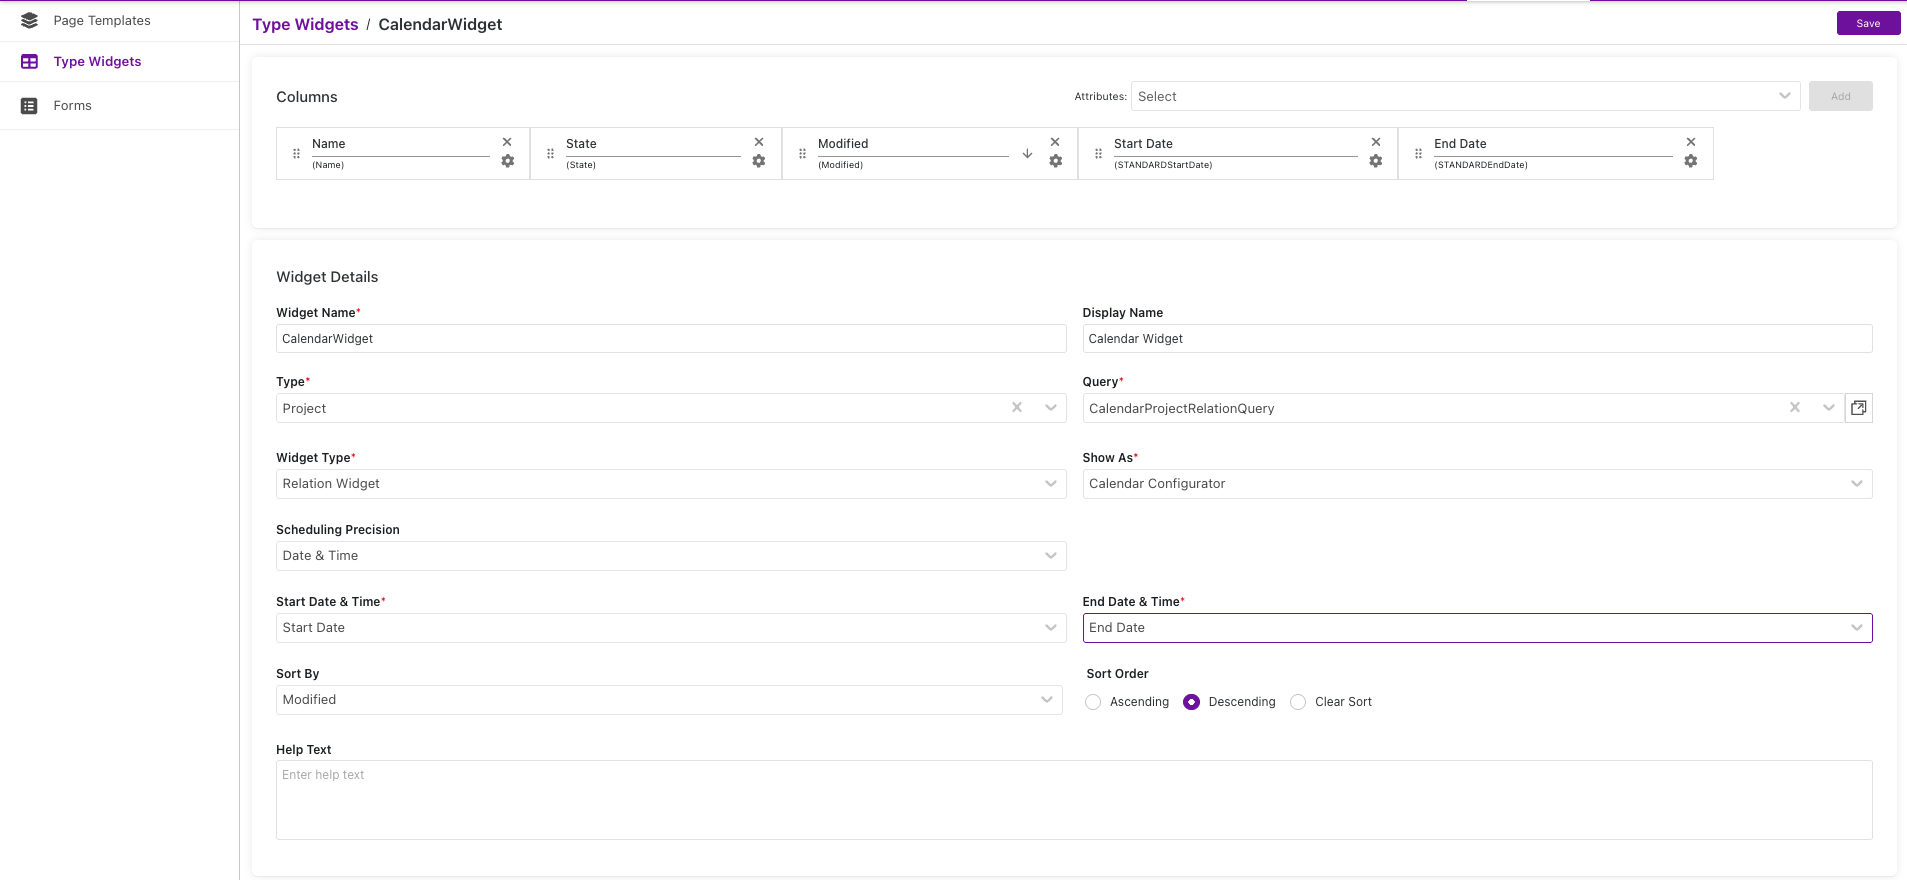
1. Configure the Widget
- Navigate to Design Studio → Type Widgets and click Create.
- Fill in the basic details — Widget Name, Display Name, Type Name, and Widget Category (Dashboard or Relation). Attach a Query Definition if you want to limit which records appear (required for Relation widgets).
- Set Show As to Calendar View, or Calendar Configurator for a Relation widget that should also manage working hours.
- Choose the Scheduling Precision — Date & Time for time-of-day scheduling, Date for whole-day items.
- Select the Start Date & Time and End Date & Time attributes. Both are required for records to appear on the calendar.
- Optionally configure the remaining sections — Column Designer, Filter Settings, and Toolbar Settings — exactly as you would for a grid widget. See Type Widgets for those sections.
- Save the widget.
2. Place it on a Template
Open the target template in the Page Template Editor and add the widget:
- Dashboard calendars go on Home or Dashboard templates.
- Relation calendars and Calendar Configurator widgets go on View templates.
See Page Template Editor for placement and container sizing. Give the calendar a generous container height — a Month view needs noticeably more room than a grid.
3. Use the Calendar
Once published, users can:
- Switch between Day, Week, and Month, and navigate with Today and the arrows.
- Click any event to open that record.
- Click or drag an empty slot to create a record with the dates pre-filled. On a Relation calendar the new record is linked automatically.
- Apply filters to narrow the events shown, or export the underlying records to CSV.
- On a Calendar Configurator, use the Working Hours and Holidays buttons above the calendar to define the record's schedule. Saved values immediately change the shading and block those slots for new events. Holidays from the assigned Organization Calendar are included automatically.
Notes
- The Start and End attributes you pick must also be added as columns in the Column Designer. The calendar reads these values from the widget's columns, not directly from the type — if either attribute isn't added as a column, its records won't appear on the calendar.
- Records without both dates don't appear. If a record's start or end attribute is empty, it is skipped. The record count in the header still counts it, so the count can be higher than the number of visible events.
- Existing events can't be dragged or resized. Rescheduling is done by opening the record and editing its date attributes.
- Applying a filter or reloading resets the calendar to the Day view on today's date. Users will need to navigate back to the period they were looking at.
- Creating from an empty slot pre-fills the standard Start Date and End Date fields. If your widget is configured on custom date attributes, users may need to enter those values in the create form.
- Create permission is required to create from the calendar. Without it, clicking an empty slot does nothing and no message is shown.
- With Date precision, an end date is treated as inclusive — a task ending 10 March covers all of 10 March.
Next Steps
- Creating and configuring widgets: Type Widgets
- Limiting which records the calendar loads: Query Definitions
- Placing the calendar on a template: Page Template Editor
- Creating and linking a related record: Create & Link Popup